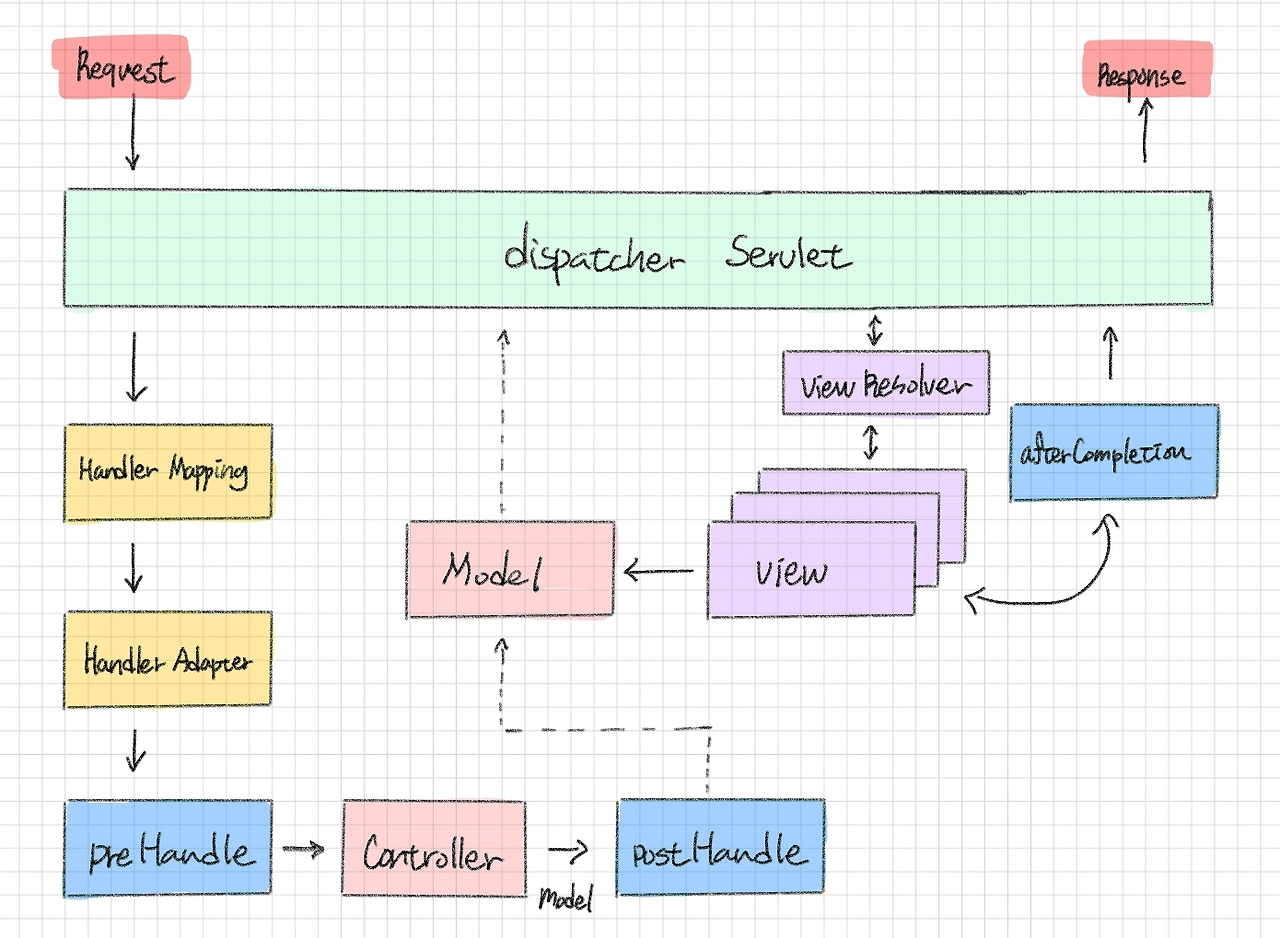
{"componentChunkName":"component---src-templates-post-jsx","path":"/[BackEnd]Interceptor/","result":{"data":{"site":{"siteMetadata":{"title":"SUbbb"}},"markdownRemark":{"id":"871dad9f-422b-50ed-8c98-d441dc97e4d0","excerpt":"GongDon 프로젝트를 진행하면서 알게 된 Interceptor의 개념에 대해 정리하는 POST다. 🔦 Interceptor란 컨트롤러에 들어오는 요청(HttpRequest)와 컨트롤러가 응답하는 HttpResponse를 가로채는 역할을 수행한다. 인증 작업이나 필요한 로직을 수행한 후 컨트롤러로 보내주는 모듈이다.  위 그림을 보면, intercept…","html":"<p><em>GongDon 프로젝트를 진행하면서 알게 된 Interceptor의 개념에 대해 정리하는 POST다.</em></p>\n<h2>🔦 Interceptor란</h2>\n<p>컨트롤러에 들어오는 <strong>요청</strong>(HttpRequest)와 컨트롤러가 응답하는 <strong>HttpResponse</strong>를 가로채는 역할을 수행한다. 인증 작업이나 필요한 로직을 수행한 후 컨트롤러로 보내주는 모듈이다. </p>\n<img src='https://img1.daumcdn.net/thumb/R1280x0/?scode=mtistory2&amp;fname=http%3A%2F%2Fcfile10.uf.tistory.com%2Fimage%2F992590395ABF406F180F86' width='80%'>\n<p>위 그림을 보면, interceptor는 <code class=\"language-text\">DispatcherServlet</code> 의 앞, 뒤에서 요청과 응답을 가로챈다. 언뜻 보면 filter와 비슷해보이는데, 분명한 차이점이 있다.</p>\n<ol>\n<li>\n<p>호출 시점</p>\n<ul>\n<li>그림만 보더라도, 확연히 호출 시점이 다른 것을 알 수 있다.</li>\n<li>filter의 경우, <code class=\"language-text\">DispatcherServlet</code> 이 실행되기 전에 호출된다.</li>\n<li>interceptor의 경우, <code class=\"language-text\">DispatcherServlet</code> 이 실행된 이후에 호출된다.</li>\n</ul>\n</li>\n<li>\n<p>설정 위치</p>\n<ul>\n<li>filter는 <code class=\"language-text\">web.xml</code> 에 설정하지만, interceptor는 <code class=\"language-text\">spring-boot-starter-web</code> dependency 설정과 interceptor 등록을 위한 config가 필요하다.</li>\n</ul>\n</li>\n<li>\n<p>구현 방식</p>\n<ul>\n<li>filter는 설정 이후, 바로 구현이 가능하다.</li>\n<li>interceptor는 등록과 등록한 빈을 사용하는 메소드 구현이 필요하다.</li>\n</ul>\n</li>\n</ol>\n<p>Interceptor에 대해 더 자세하게 보면, 아래 그림과 같다.</p>\n<img src='https://img1.daumcdn.net/thumb/R1280x0/?scode=mtistory2&amp;fname=https%3A%2F%2Fblog.kakaocdn.net%2Fdn%2FdnFaBP%2Fbtq3hasvPj5%2F7QAPXDlu5nGShwf2aEOQSK%2Fimg.png' width='80%'>\n<ul>\n<li>위 그림처럼 Interceptor는 Controller(Handler)로 가기전에 요청을 가로채는 <code class=\"language-text\">preHandle</code> , Controller 처리 후 <code class=\"language-text\">postHandle</code> , 전체 요청이 끝난 후 처리되는 <code class=\"language-text\">afterCompletion</code> 으로 이루어져있다.</li>\n<li>Handler 역할을 하는 Controller로 가기전에 가로채기 때문에 정식 명칭은 <code class=\"language-text\">HandlerInterceptor</code> 이다.</li>\n</ul>\n<hr>\n<h2>🔦 Interceptor 설정</h2>\n<p>Interceptor 사용을 위해서는,</p>\n<ul>\n<li><code class=\"language-text\">spring-boot-starter-web</code> dependency 설정</li>\n<li>Interceptor 생성</li>\n<li>Interceptor 등록을 위한 Config</li>\n</ul>\n<p>가 필요하다.</p>\n<h3>🔧 Interceptor 생성</h3>\n<p>먼저 Interceptor의 생성을 위해서는, 아래 두 가지 방법이 있다.</p>\n<ul>\n<li>Spring Web에서 제공하는 <code class=\"language-text\">HandlerInterceptor</code> Interface를 구현하는 방법 (<code class=\"language-text\">preHandle</code> , <code class=\"language-text\">postHandle</code> , <code class=\"language-text\">afterCompletion</code> 오버라이딩 필요)</li>\n<li>추상 클래스인 <code class=\"language-text\">HandlerInterceptorAdapter</code> 를 상속하는 방법</li>\n</ul>\n<p>후자를 택하게 되면, <code class=\"language-text\">@Deprecated</code> annotation에 대한 고민이 필요하다. 여기서는 전자에 대해서 다룬다.</p>\n<blockquote>\n<p><code class=\"language-text\">@Deprecated</code> </p>\n<ul>\n<li>클래스나 메소드 등을 더 이상 사용 권장하지 않는 경우에 사용하는 annotation</li>\n<li>사용이 불가능한 것은 아니지만, 차후에 없어질 수도 있다는 것을 의미한다.</li>\n</ul>\n</blockquote>\n<p><code class=\"language-text\">MyInterceptor.java</code></p>\n<deckgo-highlight-code language=\"java\" terminal=\"carbon\" theme=\"a11y-dark\" line-numbers=\"true\"  >\n          <code slot=\"code\">@Log4j2\n@Component\npublic class PostInterceptor implements HandlerInterceptor {\n\n    @Override\n    public boolean preHandle(HttpServletRequest request, HttpServletResponse response, Object obj) throws Exception {\n        log.info(&quot;url : {}&quot;, request.getRequestURI());\n        return true;\n    }\n\n    @Override\n    public void postHandle(HttpServletRequest request, HttpServletResponse response, Object obj, ModelAndView mav) throws Exception {\n        log.info(&quot;response status: {}&quot;, response.getStatus());\n    }\n\n    @Override\n    public void afterCompletion(HttpServletRequest request, HttpServletResponse response, Object obj, Exception e) throws Exception {\n    }\n}</code>\n        </deckgo-highlight-code>\n<ul>\n<li>\n<p><code class=\"language-text\">preHandle</code> : 실제 Controller(Handler)가 실행되기 전에 실행되며, <code class=\"language-text\">boolean</code> 타입의 값을 반환한다.</p>\n<ul>\n<li>true : 요청한 handler를 처리</li>\n<li>false : 처리하지 않음</li>\n</ul>\n</li>\n<li><code class=\"language-text\">postHandle</code> : handler가 실행된 후 실행</li>\n<li><code class=\"language-text\">afterCompletion</code> : 전체 요청이 끝나고 난 후 마지막에 실행</li>\n</ul>\n<blockquote>\n<p>필요한 기능에 따라 각 메소드에 구현하면 된다.</p>\n</blockquote>\n<h3>🔧 Interceptor 등록</h3>\n<p>위에서 생성한 Interceptor는 아직 정상적으로 등록되지 않았기 때문에, 해당 코드는 실행되지 않는다. Spring MVC에 등록 요청을 수행하는 Config가 필요하다.</p>\n<p><code class=\"language-text\">WebConfig.java</code></p>\n<deckgo-highlight-code language=\"java\" terminal=\"carbon\" theme=\"a11y-dark\" line-numbers=\"true\"  >\n          <code slot=\"code\">@Configuration\n@RequiredArgsConstructor\npublic class WebConfig implements WebMvcConfigurer {\n\n    private final PostInterceptor postInterceptor;\n\n    @Override\n    public void addInterceptors(InterceptorRegistry registry) {\n        registry.addInterceptor(postInterceptor)\n                .addPathPatterns(&quot;/api/post/**&quot;);\n    }\n}</code>\n        </deckgo-highlight-code>\n<ul>\n<li>Interceptor 등록을 위한 설정 파일이다. </li>\n<li>\n<p><code class=\"language-text\">@Component</code> annotation으로 Bean으로 등록된 Interceptor를 가져와 registry에 등록한다.</p>\n<ul>\n<li><code class=\"language-text\">addPathPatterns</code> : interceptor를 적용할 patterns를 명시</li>\n<li><code class=\"language-text\">excludePathPatterns</code> : 제외할 patterns를 명시</li>\n<li>각 Controller의 메소드에 대해 annotation을 이용해 권한을 확인하는 방식으로 모든 patterns에 대해 개방해둘 수 있다.</li>\n<li>나는 여기서 <code class=\"language-text\">PostController</code> 에 대한 Interceptor를 생성하기 위해 <code class=\"language-text\">/api/post/**</code> 로 명시했다.</li>\n</ul>\n</li>\n</ul>\n<p>annotation 방식을 활용하여 Interceptor에서 수행할 권한 확인을 처리할 수 있다. 아래는\n<code class=\"language-text\">MyAnnotation.java</code></p>\n<deckgo-highlight-code language=\"java\" terminal=\"carbon\" theme=\"a11y-dark\" line-numbers=\"true\"  >\n          <code slot=\"code\">@Retention(RetentionPolicy.RUNTIME)\n@Target(ElementType.METHOD)\npublic @interface MyAnnotation {\n  // 권한을 확인할 로직, 예를 들면 관리자인지 아닌지를 확인\n  UserType userType() default UserType.STUDENT;\n}</code>\n        </deckgo-highlight-code>\n<ul>\n<li>handlerMethod에 annotation을 활용한 권한 확인을 위해 추가한 annotation이다.</li>\n</ul>\n<blockquote>\n<p>Spring Security에 비슷한 기능을 하는 <code class=\"language-text\">@Secured</code> annotation이 있다.</p>\n</blockquote>\n<p>최종적으로 Controller의 Methods에 <code class=\"language-text\">MyAnnotation</code> annotation을 추가해 적절히 수행되는지 확인한다.</p>\n<h2>🔦 AOP 사용</h2>\n<p>AOP에 대해서는 다음 포스트에서 정리하도록 한다. 여기서는 위에서 생성한 annotation에 대한 실행 시간 측정을 위해서 사용해보도록 한다.</p>\n<p>먼저 AOP 사용을 위해 의존성을 추가한다.</p>\n<deckgo-highlight-code language=\"xml\" terminal=\"carbon\" theme=\"a11y-dark\" line-numbers=\"true\"  >\n          <code slot=\"code\">implementation &#39;org.springframework.boot:spring-boot-starter-aop&#39;</code>\n        </deckgo-highlight-code>\n<deckgo-highlight-code language=\"java\" terminal=\"carbon\" theme=\"a11y-dark\" line-numbers=\"true\"  >\n          <code slot=\"code\">@Component\n@Aspect // Aspect 를 꼭 명시!\n@Log4j2\nclass LogAspect {\n\n    @Around(&quot;@annotation(MyAnnotation)&quot;) // 해당 어노테이션에 대해서 \n    public Object logExecutionTime(ProceedingJoinPoint joinPoint) throws Throwable {\n        StopWatch stopWatch = new StopWatch();\n        stopWatch.start();\n\n        Object proceed = joinPoint.proceed();\n\n        stopWatch.stop();\n        log.info(stopWatch.prettyPrint());\n        return proceed;\n    }\n}</code>\n        </deckgo-highlight-code>\n<ul>\n<li>\n<p><code class=\"language-text\">MyAnnotation</code> 이 붙게 되면, 실행 시간을 측정하고 이를 로그에 남기도록 한다.</p>\n<ul>\n<li><code class=\"language-text\">Aspect</code> 로, 이 클래스가 Aspect를 나타내는 클래스라는 것을 명시한다.</li>\n<li><code class=\"language-text\">joinPoint</code> 를 가져와서, 해당 Point에서 동작되는 시간을 측정한다.</li>\n</ul>\n</li>\n</ul>\n<p>실행 시간을 측정할 Controller method에 <code class=\"language-text\">MyAnnotation</code> 을 붙여 결과를 확인한다.</p>\n<h2>📕 참고</h2>\n<ul>\n<li><a href=\"https://victorydntmd.tistory.com/176\">[Spring] Interceptor (1) - 개념 및 예제</a></li>\n<li><a href=\"https://hyeonic.tistory.com/201\">[SpringMVC] 인터셉터(interceptor) 적용 - session</a></li>\n<li><a href=\"https://araikuma.tistory.com/659\">@Deprecated</a></li>\n<li><a href=\"https://huisam.tistory.com/entry/springlogging\">Spring Boot 에서 log를 남기는 방법 - Spring log 남기기</a></li>\n</ul>","frontmatter":{"title":"💻 Interceptor","date":"March 15, 2022","update":"March 17, 2022","tags":["Java","SpringBoot","interceptor","filter"],"series":"💻 BackEnd"},"fields":{"slug":"/[BackEnd]Interceptor/","readingTime":{"minutes":6.62}}},"seriesList":{"edges":[{"node":{"id":"08d09624-7fa6-5d93-9623-abb70d863931","fields":{"slug":"/[BackEnd]JWT/"},"frontmatter":{"title":"💻 JWT"}}},{"node":{"id":"fa6720c2-ab20-5a55-b914-bbf10ec8fda0","fields":{"slug":"/[BackEnd]Sync&aSync/"},"frontmatter":{"title":"💻 동기 및 비동기 처리"}}},{"node":{"id":"72a19297-193d-5bb7-895a-44f328517242","fields":{"slug":"/[BackEnd]REST/"},"frontmatter":{"title":"💻 REST"}}},{"node":{"id":"61c43f1b-d1df-5602-9b51-8fe6fa9d3b01","fields":{"slug":"/[BackEnd]객체지향생활체조/"},"frontmatter":{"title":"💻 객체지향 생활체조"}}},{"node":{"id":"871dad9f-422b-50ed-8c98-d441dc97e4d0","fields":{"slug":"/[BackEnd]Interceptor/"},"frontmatter":{"title":"💻 Interceptor"}}},{"node":{"id":"b945159a-d6ce-5269-a463-898869856e12","fields":{"slug":"/[BackEnd]Docker배포/"},"frontmatter":{"title":"💻 Docker를 이용한 Springboot 배포"}}},{"node":{"id":"4101ebe6-43c8-571b-b984-a63d64e55d2b","fields":{"slug":"/IoC와 DI/"},"frontmatter":{"title":"💬 IoC와 DI"}}},{"node":{"id":"80b1cfb1-9f95-5921-bac9-4c540ad89c1e","fields":{"slug":"/[Backend]WebServer&WAS/"},"frontmatter":{"title":"💻 Web Server와 WAS"}}}]},"previous":{"fields":{"slug":"/[BOJ]14503/"},"frontmatter":{"title":"👩‍💻 14503. 로봇 청소기"}},"next":{"fields":{"slug":"/[JPA]6/"},"frontmatter":{"title":"📚 6. 다양한 연관관계 매핑"}}},"pageContext":{"id":"871dad9f-422b-50ed-8c98-d441dc97e4d0","series":"💻 BackEnd","previousPostId":"f1c04e8a-df0a-5294-949f-5f3a483cbcb0","nextPostId":"24c890e9-eebe-56bf-9db2-8660dcb3b783"}},"staticQueryHashes":[]}